|
|
|
|
Chapter C – Disulfide bridges and multiple chains. 1 - Obtaining the sequence – The easy way If you know the accession number of a given sequence, does not matter from which protein database, you can most easily obtain the sequence by entering the number in the web access input box in the main toolbar You retrieve a sequence by entering the accession number and either press ‘Enter’ or click on the ‘Web’ icon. The edit box has a second function, as you can enter a residue or small sequence and press the ‘Mark’ button to color the relevant residues in the sequence. Settings for the coloring are taken from the ‘Color residues’ dialog box, see above.
No matter which database was searched, the results will be presented in the ‘Import ASCII file’ dialog box: As GPMAW recognizes the format of both Swiss-Prot and Entrez, the record will be parsed into the relevant sections (i.e. name of sequence, the sequence itself, and the accession number). These can be reviewed below the record. If the sequence is not displayed, you have to select it manually: Highlight the part of the record representing the name, and click on the ‘Name’ button. Highlight the accession number, and press the ‘Access. No.’ button. Scroll to the bottom of the record, highlight the sequence and press the ‘Sequence’ button. Note as GPMAW only imports 1-letter codes that are defined in the current mass file, space characters, numbers, backslash etc. are ignored and not imported. Press the ‘OK’ button to import the sequence into a GPMAW sequence window. If the ‘Save text as annotation’ is checked (default), the entire annotation will be saved in the annotation window and will be saved along with the sequence, allowing you to access it at a later date. Note: The top part of the dialog box is an edit box. This means that you can edit the text prior to importing it into a sequence window. 2 - Obtaining the sequence – Entrez (World Wide Web). If you do not know the accession number of a given sequence, if the web retrieval doesn’t work or you are just browsing the web and happen to meet an interesting sequence, it is nice to know that GPMAW has a very flexible sequence input system: For this example we will obtain our sequence from one of the most popular molecular biology sites on the web, the NCBI site (http://www.ncbi.nlm.nih.gov/). The web site is powered by the Entrez search engine, and we will search in the protein database.
Select “Protein” in the left-hand drop-down box, and enter ‘human proinsulin’ in the search box. Press Enter or click on the go button.
The result of the search is by default shown in GenPept format. This is OK, as we will get most additional information this way.
Now press Ctrl-C to copy the entry to the clipboard. Move to GPMAW and select File|Import text (ASCII)|from clipboard. The ‘Import ASCII file’ dialog will open with the entry from Entrez in the top edit box, please refer to the picture on the previous page. As GPMAW recognizes the GenPept format, the database entry is already parsed into “Name”, “Sequence” and “Accession number”. Make sure the ‘Save text as annotation’ is checked in order to save the complete entry in the annotation page of the GPMAW sequence. Select ‘OK’ and the entire sequence is imported into GPMAW and opens a separate window.
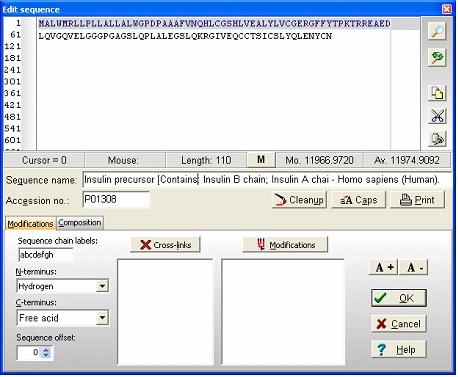
Notice that she ‘a’ button in the local toolbar is blue, indicating that there is information in the annotation page (click on the button to view the complete annotation). The color of the button indicates the content type: Gray : no content; Blue : Entrez format; Green : Swiss-Prot format; Red : content, but not in a recognized format. Now select File|Save as in order to save the sequence. In the ‘Save sequence’ dialog you enter ‘human insulin’ followed by ‘OK’. Alternatively you can save to an already existing sequence file, thus creating a sequence library. By saving several sequences to the same library, you greatly reduce the clutter on your hard drive. 3 - Editing the sequence. We now have the insulin precursor, but we want to work with the active form of insulin. First we need to know where in the sequence the active part is. Click on the red ‘a’ button (or select Info|Annotation). This opens the annotation page that contains the complete database record from Entrez (Swiss-Prot). The interesting part is close to the bottom of the page where it reads: FT SIGNAL 1 24 The information we need here is that the A-chain is from 39-59 and the B-chain is from 1 to 38. There are of course several ways of making these chains, but the easiest is to start by opening the sequence editor: Select the appropriate sequence window and select Edit|Edit sequence…; alternatively you can right-click in the sequence window to open the pop-up menu and select Edit|Edit sequence. This opens the sequence editor with the insulin precursor in the edit field.
Now we start from the C-terminus, in order not to we don’t change the original numbering. The status line just below the edit box indicates the residue to the right of the text cursor. The first step is to separate the chains using the dash (‘-‘) character, which is used as chain delimiters. To do this, enter a dash (‘-‘) at the end of the sequence. Move the cursor so it is between 89 and 90 and enter another dash. Do the same between 54 and 55. Position the cursor after residue 24 and highlight to the beginning of the sequence. The editor looks like this:
Delete the highlighted portion as this is not part of the mature protein chain. Highlight the middle portion from RRE to QKR- and delete it. Highlight the last peptide from GIVE to YCN- (the A-chain). Cut to clipboard (Ctrl-X or use the buttons in the right-hand control panel), move the cursor to the beginning of the line and paste the sequence. Finally move to the end of the sequence and remove the dash. You now have the final insulin molecule: Delete the word ‘Precursor’ from the name line and you are done. Select ‘OK’ takes you back to the sequence display. The disulfide bonds could have been entered in the sequence editor, but it is just as easy from the sequence window.
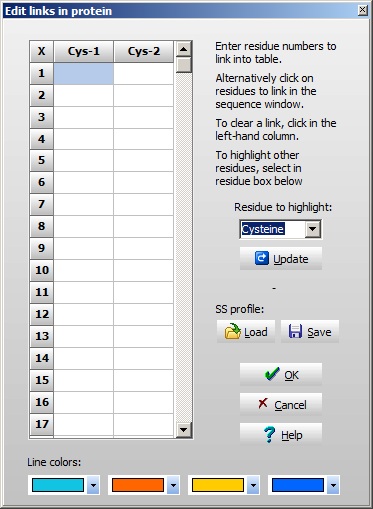
A few things worth noting when working with multiple chains: The ‘dash’ chain delimiting character becomes three dashes in 3-letter code with a dash before and after, in total five dashes. The chains are named a, b, c etc. (counting from the N-terminus) as you can see from the cursor pointing to residue 3 in the B-chain (the third position panel in the toolbar shows [3b]). For every chain delimiter, 18 Da is added to the molecular mass relative to the single chain molecule. Note: in the sequence editor you can change the naming of the chains in the ‘Sequence chain labels:’ field, i.e. if you want l and h (for light and heavy chain) you just enter l and h as the two first characters in the field. 4 – Disulfide bonds We still need to define the disulfide bonds. From the annotation page we looked at above, we can see that the following disulfide bonds are present: A-chain first to third, second to first on the B-chain, and the last on the A-chain to the last on the B-chain. When looking at the annotation information remember that the A-chain comes after the B-chain in the linear sequence of the precursor. Right-click on the sequence and select Edit | Edit cross-links from the pop-up menu or Edit cross-links from the Edit main menu (you can also use the keyboard shortcut Ctrl + F11). As soon as the cross-link dialog opens, the Cys residues will be colored, as this is the default residue to cross-link. The sequence now looks like this
If you want to link other residues, just select this in the drop-down box to the right, and click the ‘Update’ button to refresh the sequence window. If you have multiple sequences where you want the same disulfide pattern (e.g. if you have multiple IgG sequences), you can save the pattern to disk and re-load it for the next sequence. The pattern is based on link-residue 1 to link-residue 4 etc, e.g. not on specific sequence positions. This enables the pattern to be transferred even if there are insertions and deletions in the sequences. In the bottom of the window, you can select the color with which to paint the lines connecting the Cys. Select ‘OK’ and you move back to the sequence window with the defined cross-links shown in red:
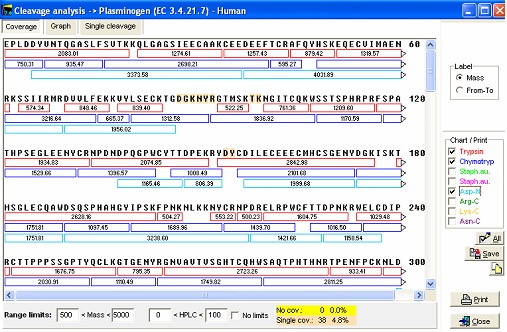
Save the file using command. This will save to the same file (and position if it is a library file). If you use the File|Save as command to save to the same file, the sequence will be appended to the sequence file, thus generating a sequence library (if the file is not already a library). If you append it to the existing file, it will be advantageous to rename the name of the sequence to differentiate from the previously saved sequence (e.g. add ‘Cross-linked’ to the beginning of the name). Note: If you imported the sequence from the Swiss-Prot database, the database annotation will end up on the annotation page of the sequence. GPMAW is able to interpret the ‘Feature’ section of this annotation, so you can import the disulfide bridges directly into to sequence with a few mouse clicks (that is if they are part of the annotation which is usually the case). The features should be imported prior to changing the sequence length. For more information please see section C.1-2, the manual and the online help. 5 – Cleaving proteins – also with linked peptides Cleaving a protein into peptides is usually done using specific proteases or using chemistry. GPMAW uses a very flexible notation that enables you to specify up to approximately 16 positions with ‘required residues’, ‘non-cleaving residues’, ‘multiple independent specificities’ etc. In addition you can enable ‘missed cleavages’, focus on a mass range, modify peptide terminals, perform deuterium exchange etc. For details check the on-line help and chapter 9 of the manual. Cleaving linked peptides generally works just like cleaving non cross-linked sequences with only a few minor differences. The fist thing to do when selecting an enzyme to use for cleavage, is to highlight the residues participating in the particular cleavage (e.g. Arg and Lys for trypsin, E for endoproteinase Glu-C, Trp, Phe and Tyr for chymotrypsin etc.). As the program use different colors for the different residues selections, you get a view of the resulting peptides. Particular regions where cleavages are difficult can usually be seen clearly (i.e. regions where cleavages are far apart or particularly close – generating very long or very short peptides that both can be difficult to separate and analyze). As in most cases, it is much easier to have an overview of the sequence when viewed in 1-letter code. Another way is to select the Cleavage|Cleavage analysis dialog. The window consist of three tabbed pages, where the first page enables you to view the peptides generated by the first 8 enzymes listed in your automatic cleavage list. In the right-hand panel you select the cleavage reagent. The main window shows the peptides generated in individual colors.
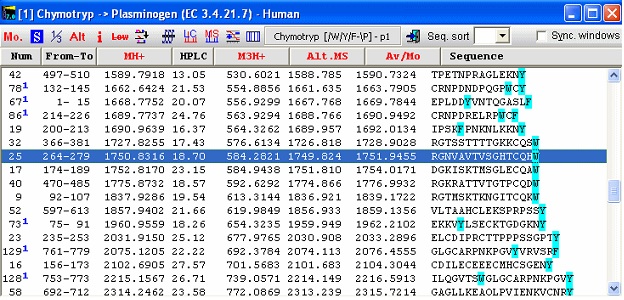
The bottom panel enables you to show only some peptides, i.e. excluding small or large peptides or excluding very hydrophilic or hydrophobic peptides. If you check the ‘No limits’ checkbox, all peptides will be shown. By clicking on the different cleavage agents you can quickly select an enzyme that gives the best-sized peptides. The graph page shows the number of peptides divided into mass ranges and the Single cleavage page shows a peptide summary along with a sequence where highlighted residues show cleavage points. Note: The coverage page can be saved to disk in ‘Coverage analysis’ format, enabling you to compare with actual sequence coverage obtained. Please see end of this handbook. For the plasminogen analyzed in the setting above, chymotrypsin seems to be a very appropriate enzyme to use for general analysis (except that it doesn’t always cleave as cleanly as several other enzymes). You now switch back to the sequence window and click on the down-arrow next to the scissors button. This opens the “Quick-cleavage” menu where you can select among the 10 top entries in the ‘Automatic digest’ list. This menu does not give you many options, only ‘1 missed cleavage’ and ‘Digest all sequences’ at the bottom of the menu, but this is usually sufficient. If you need more options, click on the ‘scissor’ button for the full options. From the drop-down menu you now select ‘Chymotrypsin /W,/Y,/F-\P, and peptide window opens:
The first column always shows the peptide number in the cleavage of the protein. In this case 66 peptides are generated as ‘clean’ cleavages, so numbers above signifies that the peptides contain a missed cleavage site. The blue superscript after the number indicates the number of missed cleavages. Note that peptide 19 contains a FP site that is not cleaved as the enzyme specifications are that cleavage does not take place in front of a proline residue. This is thus not counted as a missed cleavage. Each column contains specified information for the given peptide. Currently 19 different formats can be chosen, from mass, m/z at various charges, through pI, HPLC retention index to alternate mass tables etc. For a complete list, please refer to the on-line help, the manual and the sidebar. Notice in the window that the coloring of residues in the sequence window has been carried on into the peptide window. In addition to the ‘normal’ information, linked peptides are shown at the bottom after all non-linked peptides. The first column shows the number of the peptides linked, and the last column the mass of the peptide(s). The non-linked peptides may be sorted by any column by clicking on the respective header. Click a second time to reverse the sort order. The toolbar of the peptide window gives access to a number of functions. From left to right: Change mass type; Setup peptide list properties; 1-/3- letter residue display; Alternate column display; Peptide information (select appropriate peptide first); Remove low mass peptides from list (cutoff is set in Setup); Show partial modifications in list; ms/ms cleavage (select peptide first); simulated HPLC chromatogram; simulated HPLC chromatogram; charge vs. pI graph (select peptide first), and isoelectric focusing gel. Checking the “Sync. Windows” checkbox will result in underlining of the selected peptide in the parent sequence window. If you right-click in the window, you will get additional choices in the pop-up menu.
|
||||||||||
|
Site last updated: February 14, 2025 |
||||||||||


 In the results page select number ‘9’ by clicking on the underlined accession number ‘P01308’. Most of the results from the search are human insulin, but from different databases. P01308 is from the Swiss-Prot database. We select this entry because it is the best annotated database. You can usually recognize Swiss-Prot entries (or the associated TrEMBL entries) by starting with ‘O’, ‘P’ or ‘Q’ followed by 5 characters or ciphers. There is more information on Swiss-Prot in chapter C.1.
 Highlight the entry starting with ‘LOCUS’ and move all the way down beyond ‘ORIGIN’, remember to include the ending ‘//’ (including the ‘//’ is also important when loading Swiss-Prot records).


